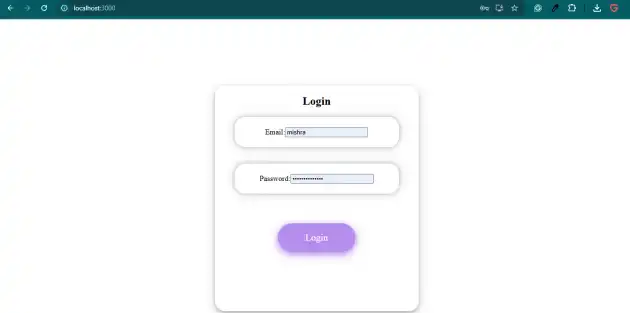
How to create basic login page in react js?
November 10, 2024Hi Friends 👋,
Welcome To aHoisting!
To create basic login page in react js, you can use form, button, input to create login page.
Today, I am going to show you, how to create basic login page in react js.
Table of contents
- Install and create a new React app.
- Import react component.
- Create a Component.
Let’s start with the first step.
Step 1: Install and create a new React app.
First you have to install the React project. You should use create-react-app command to create a new React project.
npx create-react-app my-app
cd my-app
npm start
Step 2: Import react component.
After installing, you have to import your React component.
import React, { useState } from 'react';
import "./App.css";
Step 3: Create a Component.
You can use className="login" to create basic login page in react js.
<div className="login">
      <h2>Login</h2>
      <form onSubmit={handleLogin}>
      <div className="text_area">
          <label>Email:</label>
          <input
            type="email"
            value={email}
            onChange={(e) => setEmail(e.target.value)}
            required
          />
        </div>
        <div className="text_area">
          <label>Password:</label>
          <input
            type="password"
            value={password}
            onChange={(e) => setPassword(e.target.value)}
            required
          />
        </div>
        <button type="submit" className='btn'>Login</button>
        {errorMessage && <p style={{ color: 'red' }}>{errorMessage}</p>}
  </form>
</div>
Create basic login page example.
The below code is an example of a React. You have to import react and use form, button, input to create basic login page in react js.
App.js
import React from 'react';
import Login from './login';

const App = () => {
  return (
    <div className="App">
      <Login />
    </div>
  );
};

export default App;
App.css
body{
  text-align: center;
}

form{
  display: inline-block;
  align-items: center;
  height: 270px;
  width: 350px;
  margin-bottom: 170px;
}
.text_area{
  align-content: center;
  border-radius: 22px;
  margin-bottom: 35px;
  width: 100%;
  height: 64px;
  box-shadow: 0 0 8px 0 rgba(0, 0, 0, 0.2), 0 0 20px 0 rgba(0, 0, 0, 0.19);
}

.text_input{
  margin-top: 1.2rem;
  font-family: 'Montserrat regular';
  font-size: 20px;
  border: none;
  width: 80%;
}

.btn{
  margin-top: 28px;
  width: 165px;
  height: 60px;
  border-radius: 30px;
  background: #B58DED;
  border: none;
  font-family: 'Montserrat';
  font-size: 20px;
  color: #FFFFFF;
  box-shadow: 0 4px 8px 0 rgba(181, 141, 237, 0.7), 0 6px 20px 0 rgba(181, 141, 237, 0.9);
  cursor: pointer;
}

.login{
  display: inline-block;
  background: #FFFFFF;
  width: 434px;
  height: 480px;
  margin-top: 10%;
  border-radius: 22px;
  box-shadow: 0 4px 8px 0 rgba(0, 0, 0, 0.2), 0 6px 20px 0 rgba(0, 0, 0, 0.19);
}
login.js
import React, { useState } from 'react';
import "./App.css";

const Login = () => {
  const [email, setEmail] = useState('');
  const [password, setPassword] = useState('');
  const [errorMessage, setErrorMessage] = useState('');

  const handleLogin = (event) => {
    event.preventDefault();

    // Basic login validation (for demonstration purposes)
    if (email === '[email protected]' && password === 'password123') {
      alert('Login successful!');
    } else {
      setErrorMessage('Invalid email or password');
    }
  };

  return (
    <div className="login">
      <h2>Login</h2>
      <form onSubmit={handleLogin}>
      <div className="text_area">
          <label>Email:</label>
          <input
            type="email"
            value={email}
            onChange={(e) => setEmail(e.target.value)}
            required
          />
        </div>
        <div className="text_area">
          <label>Password:</label>
          <input
            type="password"
            value={password}
            onChange={(e) => setPassword(e.target.value)}
            required
          />
        </div>
        <button type="submit" className='btn'>Login</button>
        {errorMessage && <p style={{ color: 'red' }}>{errorMessage}</p>}
      </form>
    </div>
  );
};

export default Login;
In the above code example, I have used the form, button, input to create basic login page in react js.
Check the output of the above code.
All the best 👍
