How to create card in react js?
November 14, 2024Hi Friends 👋,
Welcome To aHoisting!
To create card in react js, you can use <div> and card css as the detail you will find below the blog. It will create card in react js.
Today, I am going to show you, how to create card in react js.
Table of contents
- Install and create a new React app.
- Import react component.
- Create a Component.
Let’s start with the first step.
Step 1: Install and create a new React app.
First you have to install the React project. You should use create-react-app command to create a new React project.
npx create-react-app my-app
cd my-app
npm start
Step 2: Import react component.
After installing, you have to import your React component.
import React from 'react';
import Card from './Card';
import logo from './img/banner.jpg'
import skyline from './skyline.jpg'
Step 3: Create a Component.
You can use <Card> to create card in react js.
<div className="app">
   <h1 style={{textAlign:"center"}}>Our Cards</h1>
      <div className="card-container">
    <Card
      title="Banner"
      text="Welcome To aHoisting!"
      image={logo}
      buttonText="Explore"
      />
      <Card
      title="City Skyline"
      text="Discover the city’s stunning skyline views."
      image={skyline}
      buttonText="Visit Now"
    />
  </div>
</div>
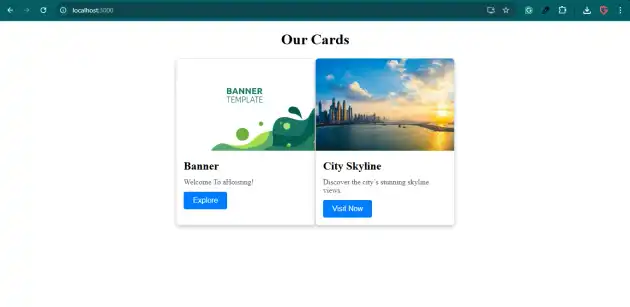
Create card example.
The below code is an example of a React. You have to import './Card' and set <Card> to create card in react js.
App.js
import React from 'react';
import Card from './Card';
import logo from './img/banner.jpg'
import skyline from './skyline.jpg'

function App() {
    return (
        <div className="app">
            <h1 style={{textAlign:"center"}}>Our Cards</h1>
            <div className="card-container">
                <Card
                    title="Banner"
                    text="Welcome To aHoisting!"
                    image={logo}
                    buttonText="Explore"
                />
                <Card
                    title="City Skyline"
                    text="Discover the city’s stunning skyline views."
                    image={skyline}
                    buttonText="Visit Now"
                />
            </div>
        </div>
    );
}

export default App;
App.css
.card-container{
  display: flex;
  justify-content: center;
}
.card {
  width: 300px;
  border: 1px solid #ddd;
  border-radius: 8px;
  overflow: hidden;
  box-shadow: 0 4px 8px rgba(0, 0, 0, 0.2);
  background-color: #fff;
  transition: transform 0.2s;
}

.card:hover {
  transform: scale(1.05);
}

.card-image {
  width: 100%;
  height: 200px;
  object-fit: cover;
}

.card-content {
  padding: 16px;
}

.card-title {
  font-size: 1.5rem;
  margin: 0;
}

.card-text {
  font-size: 1rem;
  color: #555;
  margin: 12px 0;
}

.card-button {
  padding: 10px 20px;
  font-size: 1rem;
  color: #fff;
  background-color: #007bff;
  border: none;
  border-radius: 4px;
  cursor: pointer;
  transition: background-color 0.2s;
}

.card-button:hover {
  background-color: #0056b3;
}
Card.js
import React from 'react';
import './App.css';

const Card = ({ title, text, image, buttonText }) => {
    return (
        <div className="card">
            {image && <img src={image} alt={title} className="card-image" />}
            <div className="card-content">
                <h2 className="card-title">{title}</h2>
                <p className="card-text">{text}</p>
                {buttonText && <button className="card-button">{buttonText}</button>}
            </div>
        </div>
    );
};

export default Card;
In the above code example, I have used the <Card> to create card in react js.
Check the output of the above code.
All the best 👍
